::How to Paint Kitchen Cabinets & BHG Photo Shoot Revisited::
/Going thru old blog posts on ::cottage instincts:: has been super interesting as well as super weird.
Like reading an old diary. Part "hey, I'm a pretty good writer/decorator/photographer" and part "oh hell no."
Anyway, I'm kickin' it back Old School and rehashing a few posts I thought would be fun to revisit over here. Like the time I was contacted by Better Homes and Gardens.

And I thought it was spam and almost deleted it.
They wanted to come do a shoot of my son's kitchen. I'd helped as a design sounding board and did all the painting, then did a post about it and linked up to Thrifty Decor Chick's monthly before and after party...that's how they found me.
The shoot took place in September of 2013, and the issue hit magazine stands in September of 2014.


See it HERE on their site. The hardcopy was a four page spread.
Here's a before, a few of my own pics from the day of the shoot, and a brief tutorial on what I used and how to git 'r done.

Betsy was the stylist and wrote the copy. She was so so great!
She brought a ton of fun stuff for staging.
I got to fill the potato and onion bins.
Oh, and that dish detergent decanter at the sink.
I'm just that talented, yo.

This is Justin, who was just thrilled that I was taking this pic.
Besides offering his talent for taping the blind cords out of sight, he was the photoshop magician :)

This here is Warner, the main photographer who also offered me some tips with my own Canon.
Not that I remember what he told me.

Justin doing his thing....offering suggestions on lighting and so forth as each shot appeared on his monitor.
Betsy froofs in the background.


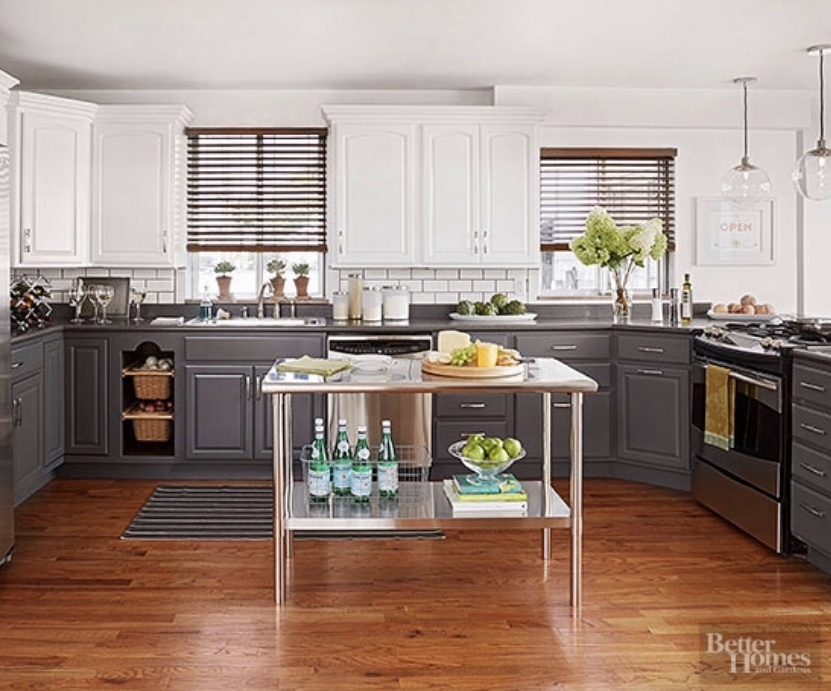
They got the pendants from West Elm. And BHG purchased the stainless island the the kids got to keep!
Now for the what I used and the how I did its:
I can tell you right now, that I will forever use this paint on cabinets, and probably on trim and furniture as well if I'm going for a supah, doopah smooth and hard finish with a bit of shine (it comes in satin as well). I was honestly in awe of how smoothly it went on, how it self-leveled (like I could literally watch brush and roller marks fade away) and how well it covered.

This stuff is da bomb. It's actually oil based, but water borne.....a fancy way of saying it washes off with water like latex, doesn't stink, but stays wet a bit longer and dries rock hard like oil. I'm tellin' ya, it's fab.
I had the primer for the bottom cabs tinted as they were going to be deep grey. Only took 2 coats of the paint for excellent coverage. The white took 3 coats, though.
I was told to use Wooster Silver Tip brushes as they are very soft, and indeed, the paint flowed off them like melted butter. They are actually quite a bit cheaper than my beloved Purdy, but again, with this paint, for this job, Wooster rocked it.
I also used Wooster Microplush rollers....again, LOVED these. They didn't suck up so much paint that they left trails like other rollers, made for a very smooth application, and they cleaned up really well. I had to find the right type of roller handle for them, and Purdy came to the rescue.
Paint colors are Ben Moore's 'Deep Space' on the bottom and their premixed White for the top.

My process:
Remove all the doors and hardware. I didn't paint the backside of the doors or the inside of the cabs.
Wipe everything down with a non-terrycloth towel dipped in a liquid deglosser using gloves. Let dry.
Tape off areas you think you'll get paint slopped on.
Prime every surface. Let dry.
Paint every surface. Let dry at least 24 hours.
Do a light sanding of the surface with 220 grit and use tack cloth to remove dust. I also blow out corners just to be sure there's no dust left.
Paint a second coat on every surface.
Depending on the paint used, it may take another light coat for full coverage. You also may want to sand any areas again that may show up...for instance, I found a few drips here and there where I'd laid the paint on too thickly on a vertical surface. I sanded these gently and wiped them clean.
The beautiful thing about the Ben Moore Advance paint, is that it sands so nicely....not rolling off like semi gloss latex can do. It's just a fabulous paint to work with.
Also, for those interested in time commitment for such a job: Each coat took me approximately 4 hours (top and bottom, doors and frames). That's just actually painting, not including taking doors off, cleaning, sanding/wiping etc. Just painting: 4 hours per coat. It's not a quick job.
I need to show you the finish on these babies up close. Here's the gray on the bottom....
See how smooth?

Here's the white up close and personal:
Not a brush or roller mark any ding dang where.

I know right?


I know lots of bloggers get magazine features, but I'm so tickled that I got to participate in this one! My kids' style is very different than mine, but I was honored to help with a bit of the design and work that went into this space....and was happy that sharing it on the blog brought us this opportunity.